My Education Journey

Month: March 2020

When to use ASL in the classroom?

Happy Tuesday! Thanks for tuning in to another exciting ASL blogpost. Over the past 2 months, I have shared a variety of reasons as to why you should use ASL in the classroom. We have learned the value of having non-verbal communication and how to support both deaf and hearing students. This idea led me to wonder when is it appropriate to integrate ASL in the classroom, and when should it no be used. 

As a society, we understand the importance of utilizing verbal communication skills in order for students to formulate conversations and relationships with their peers. That said, you cannot solely rely on ASL as a form of communication. As a teacher, you have the choice of when you should teach sign language to your students. I have decided to brainstorm a list of occasions of when to use ASL and a few example words for each one.

Using sign language in a hearing classroom has many benefits, but one thing I noticed through my research was that there were no negatives towards using it. We often do not think of the negatives around teaching tools but its something to consider in more depth. There are no set guidelines as to when to use or not use sign language, but ultimately, you can choose what works best for your classroom.

– Ms. G 🙂

Minecraft Education

In today’s class, we had the opportunity to learn about using Minecraft in an educational setting from Heidi James. We began by logging into the desktop and having a few minutes to explore and try Minecraft. I personally had a bit of trouble in the beginning as I got stuck in the water and could not figure out how to get out. Fortunately, some of the students from the middle school came around and were able to help me. 

After a few minutes of “play” time, we learned a little bit about the boundaries and possibilities of Minecraft Edu. As the teacher, you have the ability to control everything and anything that occurs in your Minecraft server. I was surprised to see that she was able to freeze our screens so that no one had the chance to be distracted by our screens. There are two different modes of Minecraft; creative and survival. 

One of the students discussed how they were assigned to create a civilization during a certain time period. They were asked to create buildings and scenarios that would reflect the feudalism era. Another student built a life-size hedgehog cage which utilizes perimeter, area, and ratio skills. Some other options the teacher discussed were combining Minecraft and language arts to create landscapes for stories. Also, in Science, they had students re-create a human digestive system.

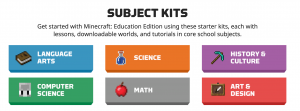
In the image above, you will see a variety of subject areas with Minecraft lesson plans divided into various grades. I found one called “Fairy Tale Reimagined” which allows students in grade’s k-5 to recreate fairytales in the world of Minecraft. This is a great tool for teachers to use and provide a creative outlet for students. Overall, I can see how Minecraft can be a beneficial educational tool. However, I currently do not feel comfortable using Minecraft in the classroom as I am not familiar enough with it yet.

– Ms. G 🙂

Music Blog #4 ~ Mamma Mia!

As we begin the second half of the semester, I am really focusing on sharpening my ukulele skills and expanding my musical knowledge. This week, I am beginning to learn the chords to my final song “Mamma Mia”. I chose this song because Mamma Mia is my favourite movie and I believe it is important to be passionate about what you are playing. When I played piano in elementary school, I was often more enthusiastic about songs that I already knew. 

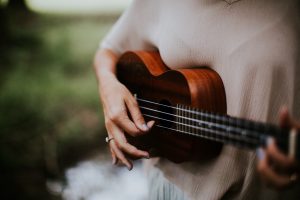
Photo by Hannah Busing on Unsplash

The chords used in this song are the following: “D, A, G, Bm, Em”. When I originally chose this song, I had looked at a slightly different version of this song, but after playing both versions, I preferred this one. This song is appearing to be the hardest song I have attempted to learn as the chord transitions are quick and put a strain on my wrist. I am currently working on transitioning from an A to a Bm chord which is a challenge as the Bm chord itself is awkward to hold. I am practicing using my index finger as an anchor for the chord as it slides down one fret but remains on the second string. Over the next few weeks, I am going to increase the speed of the song once I feel more comfortable with the chords.

Along with learning the chords, Alexa and I have been working together to help each other learn the song. Our goal is to be able to perform it together by the end of the semester. I have found that peer teaching has been a huge asset through my musical growth journey. Between the two of us, we can provide feedback for each other as well as work on timing and rhythm. I believe this is a strong component of musical education as students learn a lot from their peers around them. In the future, I hope to utilize peer teaching while playing the ukulele as a way to expand the knowledge towards more students. As a teacher, it is difficult to give every student the one-on-one attention they need. It is important to allow the stronger students to act as mentors and guides for other students to follow. Alexa has experience playing guitar, and while the ukulele is different, this has helped me to learn a lot about chord positioning and posture.

– Ms. G 🙂

A Change In Direction Blog #4

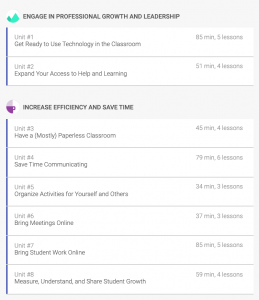
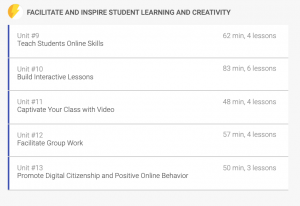
After discussing our timeline with each other, we have decided to change the direction of our inquiry. While we feel the google certification program is a valuable asset, the amount of work necessary to complete it is unrealistic at this point in time. Last week, we looked into the first unit of the course which would have taken us a minimum of 85 minutes. The entire course suggests that it would take about 775 minutes. If you see the following images below, you will see the extensiveness of the course. To complete this course and spend time to blog about it, we do not have enough time on top of our current academic course load. 

We will now be using this inquiry as a way to learn more about the apps in the GSuite. We think this will benefit our future teaching careers while also being a realistic goal for our current student schedules. Once we become really well acquainted with the google apps, we will be able to teach our students how to use them easily and also be able to seamlessly incorporate them into our future classrooms.

The first app we will be looking at is “Science Journal.” This is a Google app that “transforms your device into a pocket-size science tool that encourages students to explore their world. As they conduct eye-opening experiments, they’ll record observations and make new, exciting discoveries.” This app can be used in younger classrooms that have tablets/iPads or in older middle school classrooms where students have their own phones.

The app allows students to document their science experiments through measurement, picture taking, and note-taking. The app is free and provides “70 hands-on science activities from education experts.” 

– Sarah, Heather, Lauren

ASL and Basic Manners in the Classroom

This week, I thought about what ways I want to use ASL in my future classroom. This idea brought me back to a personal experience I had a few weeks ago. I was teaching a PE lesson into a grade one class, and the students showed us a “silent appreciation” to me and my peers. I was pleasantly surprised to see all the students were demonstrating the signs “thank-you” and “applause” in sign language. This simple gesture showed was a way for the students to show their gratitude in a small way. 

In the primary years of elementary school, students begin to develop their own attitudes and behaviours towards others. As teachers, we have the responsibility to exemplify positive behaviour as our students are susceptible to our actions. We are role models and students will follow and mimic what we do. For today’s research, I decided to look into signs that you could teach your students some basic manners.

In this first video, you will learn the signs “please” and “thank you” in the tune of a catchy song. These signs are perfect for both the student and the teacher to learn and use on the daily.

In this video, you will learn the signs “more”, “all done”, “food”, “milk”, “water”, “sleepy”, and “toilet”. These signs are often taught to infants but can also be used in the classroom usually around snack time. In my opinion, the most useful sign is “toilet”. Rather than having a student disrupt the class, the could simply show the sign to the teacher and go. 

The last video demonstrates two signs that are simple confirmation signs. This video repeats a few signs we have already learned, but the three new signs are “yes“, “no“, and “your welcome“. These signs are easy to do to quickly answer a question a student may have.

Thanks for reading!

– Ms. G 🙂

Using ASL to Respond to Questions

Happy Thursday! I hope that everyone had a good reading break and are ready for the rest of the semester. As we approach the end of the term, I am continuing to improve my own ASL skills while learning more about how ASL can be used in the classroom. For this week, I am going to look at a first-hand account of a teacher using ASL in their classrooms.

The website I found is called “Education Oasis”, a blog where teachers can share strategies they use in a multitude of subject areas. The article “Using Sign Language in the Classroom” by Rick Morris, discusses how he uses sign language to communicate with his students. In his blog, he gave the students a math problem and had different ways he used ASL to help create more efficient conversations with his students. In the 3 images below, you will see which signs Rick has taught his students.

Images from Rick Morris’ Blog

I could 100% see myself using these communication techniques in my classroom. This is beneficial because if you see a student with their hand raised, you may be unsure of what they are going to say. If you are wanting an answer to a question, but someone still does not understand, the teacher can call on that student before getting the answers so it gives that student a chance to understand. Non-verbal communication in the classroom is extremely important. In the chaos of the day, it can be difficult to be consistently relying on verbal communication. Using ASL can help eliminate confusion in every classroom.

– Ms. G 🙂

Multimedia Learning Theory & “ScreenCastify”

For today’s class, we began by debriefing the field trip to Rebecca’s class last week and then moved into multimedia learning theory. Multimedia learning theory is about the process in which we remember things and how things are regulated into our working memory. In our EDCI 336 course, Rich encourages “learning by doing” and in class, we have many opportunities to try new technological things. When the class is over, we blog about our experiences to reaffirm our learning and understanding. That repetition of a skill helps the brain to be more likely to internalize the information and be able to recall it at a later date. One resource that is proven to be useful is “Sketchnotes”. While I have never used the program before, the concept is to draw pictures along with your written notes which will help with memory recall. Our class will be trying this program in the next couple of weeks and I am very interested to see how this might be implemented into the classroom. 

Moving on, our class began to discuss how educational videos can be utilized in the classroom. Three possible video platforms that teachers can use are “Youtube” “Khan Academy” and “TeacherTube”. Some reasons why using videos in the class is beneficial is that videos can be engaging, offer new perspectives, and help to show concepts or things that may not be accessible based on the school (ie. students do a project on Egypt and want to see the pyramids). However, there are some cons which come with videos is that not everyone has access to technology, students may not be engaged with the video, or students may choose to not watch the video. It is important to remember that if you are going to use videos in the classroom, make sure they are suitable and relevant to the lesson you are teaching. 

Afterwards, we practiced using “Screencastify” to screen record our computers to show students how to use the computer to look something up. In the video below, I used the example of sloths as my screen recording. If I were to make this into the inquiry project, I would have students initially watch a video of sloths in the Costa Rican jungle to illicit excitement into the subject. Then, I would have students do some primary introductory research to learn a base level about sloths. Once they know a bit of information, I would have the students develop an inquiry question about sloths. This could be like “what do sloths eat? where do sloths live? how do sloths climb?” and so on. 

– Ms. G 🙂

Rebecca Bathurst’s Classroom Visit

Last Tuesday, my EDCI 336 class had the opportunity to visit Rebecca Bathurst’s kindergarten classroom and learn about how she incorporates technology and inquiry with her students. Unfortunately, I was unable to attend in person as I was in Vancouver that day, however, I had the opportunity to view her speech via video and hear her perspective. She began her presentation by discussing a bit about her background in teaching and her experiences prior to teaching at George Jay. 

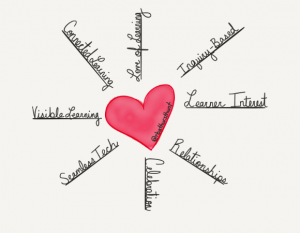
One of the first things Rebecca discusses is her “educator heart”. Her “educator heart” is essentially the morals and values that she upholds as a teacher. The image below shows a diagram of some of her core beliefs and goals that she aims to express in the classroom. 

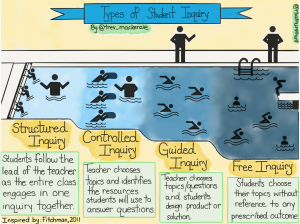
Rebecca then began to discuss how she implements inquiry-based learning into her classroom. With the students this year, they began with a guided/controlled inquiry which was much more structured than my original interpretation of an inquiry project. The image below was in Rebecca’s PowerPoint and I feel that it gives a great visual of various types of inquiry.

The first inquiry that the class did was on their families. From there, she discovered that her students were passionate about dinosaurs and then created a guided-inquiry based on them. She also discussed how she used provocations by providing an experience that would spark curiosity in the student. An example could be taking the students on a field trip then asking them “what they see, what they already know, and what they want to know”. This would be the starting point of the inquiry project and from there, the students would work towards answering their inquiry question. 

The last thing I noticed while watching was how beautiful and natural Rebecca’s classroom was. The class had lots of wood-based items and things that create a calming space. She also had lots of dinosaur items for students as they are relevant to the current inquiry project the students are studying.

Overall, I really liked how Rebecca incorporated inquiry-based learning in her classroom!

-Ms. G 🙂

The First Unit

This first unit is called “Getting Ready to Use Technology in the Classroom” and discusses how educators must have clear learning goals for their students before implementing technology into their classrooms. By deciphering what they want to get out of their lessons, teachers can more appropriately select online tools to enhance their classes.

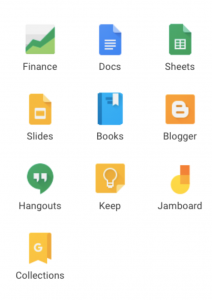
In this unit, we learned about G-Suite and the various tools available within it – Google Docs, Sheets, Slides, Hangouts, Blogger, Drive, Maps, YouTube, Calendar, Gmail, etcetera. It explains further how there are three pillars of digital responsibility to consider while using these sorts of technology including copyright and fair use, online safety, and communication. If these guidelines are followed online instruments have the potential to “support the work you currently do”, “prepare for the future”, and “help your students behave responsibly online” (https://teachercenter.withgoogle.com/fundamentals/unit?unit=1).

This was an informative introduction to Google and all of its extended tools, but it definitely took some time to thoroughly work through the entire unit. A helpful addition to the process is a review quiz at the end that helps to ensure you understood all of the information. Despite this and the straightforward instructions throughout the units, this is going to be a larger commitment for us to complete.

– Lauren, Sarah, Heather

Page 2 of 2

Powered by WordPress & Theme by Anders Norén